Spider gel
Amber D'Halluin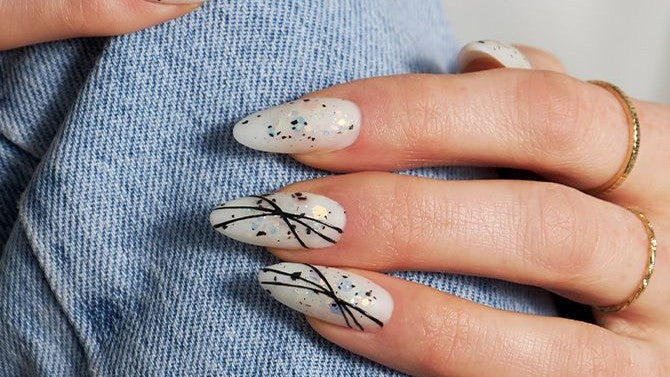
1. What is spider gel?
Spider gel is a viscous and rubbery substance that allows you to create straight, fine lines on your nails. The nail art technique is often used in a nail studio because you have a unique result in a short period of time. In addition, it is very easy to apply. You place your brush or cuticle stick in the spider gel pot. When you lift the tool, you will notice that the viscous substance remains. Now go from one place to another on your nail. After performing this movement, the viscous gel will leave a line on your nail in the shape of your movement.
Spider gel is a technique that has been on the market for a few years. It started with the standard white and black color. When the popularity of the gel increased strongly, many other colors were released. The rapid growth of nail stylists who use the product is mainly due to the low level of difficulty and the short time required, while still having a creative nail art styling as a result. Buy spider gel = save time!
Professional spider gel has a very high pigmentation. Due to the very high coverage even the thinnest lines are clearly visible. Spider gel can be applied to any artificial nail technique (acrylic, gel, gel polish and acrylic gel).
2. What do you need for spider gel?
Spider gel is a nail art technique and is therefore only applied at the end of a gel polish manicure. It is important that the correct base coat and gel polish colour have already been applied. To apply the spider gel, you only need a nail art brush or stick in addition to the basic products. The gel must finally be hardened in a UV/LED lamp.
- Products to perform a manicure
- Nail art brush or cuticle wooden sticks
- UV/ LED nail lamp
3. How to apply spider gel?
Spider gel is a finishing method, so the first steps in a manicure must already be done well. You can apply the spider gel both on the color and on an already hardened top coat. It is always important to cover the spider gel with a top coat so that your nail art creation is well protected.
Prepare your nails for a manicure .
Apply the nail prep and primer.
Apply the correct base coat.
Apply your desired color to the nail.
Now we are ready to apply the spider gel:
- Take a small amount of spider gel on a nail art brush, cuticle orange wood stick or dotting tool.
- Drag the spider gel from one point (e.g. the edge of the nail) to the other point with a firm continuous movement. Create your dream pattern with this.
- Cure the spider gel in a lamp UV 120s / LED 30-60s.
Finish your nails with a top coat.
4. Nail art inspiration with Spider Gel
Spider gel is a nail technique that has few creative limits. You can create a thousand and one different styles with it. Think of straight lines, geometric designs or just free movements. To show you some possibilities of spider gel, you will find two different spider gel videos below.
General spider gel ideas
In this video you will find three fun ideas that are easy to implement, but have a beautiful and unique result.
Smokey spider nail art styling
In this manicure, a reverse black ombre is applied to the nail. After that, a finishing touch is given with white spider gel and rhinestones.
5. The different spider gel colors
Surprise your customers with an artistic, colorful and easy nail art! In our assortment you will find different colors. This way you have a suitable effect for every season. For example, the neon spider gel colors are great during the summer and the metallic colors are more for the holidays or carnival.
Did you know that you can make almost any color on earth yourself? You add the pigment paste to white or black spider gel and thus create your own unique color! To obtain the desired color you have to mix the spider gel with a small amount of pigment paste. Keep in mind that pigment paste does not harden under a nail lamp, therefore only 1/10 pigment paste may be used on 1 part spider gel.
The Mistero Milano range currently includes 3 collections: the standard spider gels, neon colours and metallic colours.